Smart Home Products Easy Fit Awning Assembly Instructions.
Tools Required.
- Spirit Level
- Rubber Mallet
- 14mm Masonry Drill Bit
- Power Drill with Hammer Function
- 5mm Socket Wrench (Optional)
- Adjustable Spanner
Step 1 : Roller Assembly
Caution: Once assembled this cannot be disassembled.
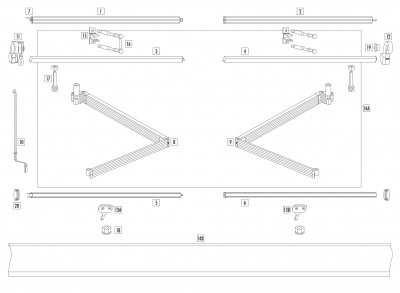
Insert the Left Roller (1) into the Right Roller (2). Whilst keeping the rollers aligned rotate them tightly as pictured below.

Step 2: Torsion Bar Assembly
Connect the Left Torsion Bar (3) into the Right Torsion Bar (4) and rotate tightly. Make sure to keep the four face alignment. The two torsion bars must be facing the same direction.
Do not untie the strapping until the Easy Fit Awning is fully assembled and fitted.

Step 3: Front Bar Assembly
Insert the Left Front Bar (5) into the Right Front Bar (6) and rotate tightly. Make sure to keep the four-face alignment as performed in Step 2.

Step 4: Front Bar Wrist Support Assembly
Slide the Front Bar Wrist Supports (13A and 13B) into either either end of the front bars (5 and 6).

Step 5: Arms with Front Bar Assembly
Locate the Front Bar Wrist Support Bolt through the hole of the small arm. Position the front bar 60mm in from the wrist support.

Step 6: Locking the Hexagon Bolt
Once positioned, tighten the hexagon bolt (17) on the back of the Front Bar Wrist Support with the 5mm hexagon wrench provided.

Step 7: Fasten Self-Locking Nuts
Fasten the Self-Locking Nuts (18) onto the bolts in the front bar with wrench provided or a socket spanner.
Do not tighten fully.

Step 8: Left Roller Support wth Gearbox Assembly
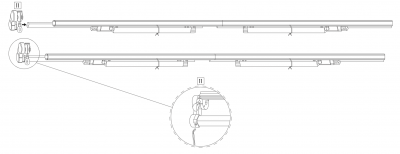
Hammer the Left Roller Support with the gearbox (11) into the Left End Torsion Bar (5) using either a rubber mallet or wooden hammer. Tighten the left hexagon bolt (17) with the 5mm Hexagon Wrench provided as shown below.
Step 9: Fabric and Valance Assembly
Open the fabric bag to find the awning fabric and valance fabric (14A and 14B). Thread the Fabric Liner (7) through the Fabric (14A) and valance (14B).

Step 10: Retract the Fabric on the roller
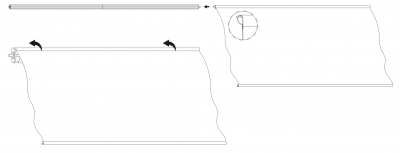
Roll the fabric onto the roller making sure the fabric is rolled in the correct direction as seen below.
Step 11: Attach the Fabric to the Front Bar
Thread one end of the fabric evenly through the groove in the front bar until it reaches the other side. Insert the roller shaft into the square hole of the gearbox.
Step 12: Right Roller Support Assembly
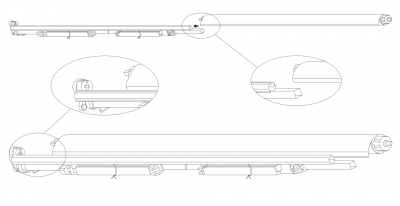
Locate the round collar (19) into the right roller support. Insert the shaft of the roller into the round collar. Insert the torsion bar into the right roller support using either a wooden or rubber mallet. Tighten the right hexagon bolt using the 5mm hexagon wrench provided as shown below.
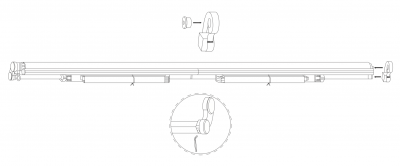
Step 13: Final Assembly
Starting from the left, slide the valance through the groove of the front bar all the way through to the right side. Make sure the right and left side split. Push the Front Bar Covers (20) into the end of the Front Bars.
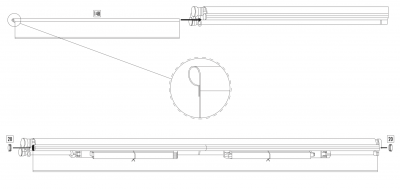
Smart Home Products Easy Fit Awning Installation Instructions.
Step 1: Measuring and Marking your wall
Note: Your sub-straight should be a minimum 310mm in depth.
Choose where you would like your Easy Fit Awning to be installed. Using a marking pencil, mark the position of the bolt holes. To ensure your awning will be installed level, check your markings using a spirit level.
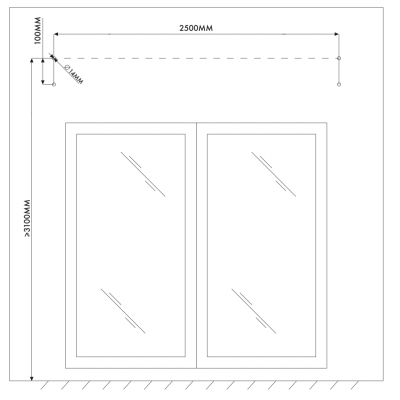
Step 2: Installing the Brackets
Using a 14mm masonry drill bit, drill the holes according to the markings draw in in Step 1. The depth of the hole should be a minimum of 90mm. Unscrew the bolt from the expansion sleeve and push the bolt through the bracket. Re-fit the sleeve and the expanding retainer nut on the other side of the bracket. Knock the whole assembly into the hole.
When fully located tighten with a wrench as below.

Step 3: Install Easy Fit Awning
Install the awning onto the brackets and fasten through using the hex bolts (17). Fit the Self -Locking Nut (18) and tighten firmly.
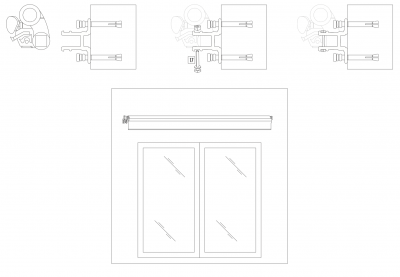
Step 4: Opening the Arms
After locking the awning, use the hand crank (10) to close it. Carefully cut the bindings holding the arms as shown below.

Step 5: Open your Easy Fit Awning
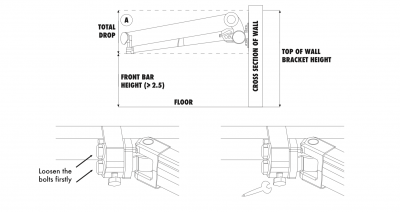
Unwind the awning the awning and check wether the horizontal pitch of the front bar needs to be adjusted.
Note: The height between the ground and the front bar should be 2500mm or more. If not, please adjust the arm pitch as shown below.
Step 6: Using you Easy Fit Awning
The awning can be operated normally when you’ve finished adjusting the level of the front bar. The shape of the awning fabric should be set as below.

